
Setting up a Composition with the Miira for iOS app
I've been working on a series of small paintings that I try to finish in just a few hours and in this post I'm going to explain how I can very quickly set up the composition and lay in the foundation drawing before I begin to paint. There is nothing worse than finding errors in the drawing once the painting begins! Building a solid foundation really saves me time, energy and money!
First, I'll begin with setting up the still-life. I usually work from life. I want to make sure the composition is solid, so I'll try many configurations of the subject before I begin a painting.
Using the Miira app for iOS, I CAPTURE an image of the subject and set up the camera to see the it as closely to my eye level. There will be some camera distortion but I can make adjustments later, when I'm back to looking at the subject, not the photo. The photo and the the Miira app helps me to set up the composition on my painting surface quickly and accurately. Plus, I learn something about what I see in my still-life every time I use the app.
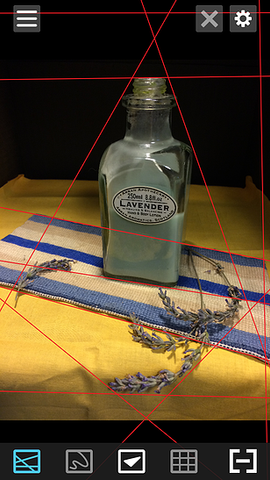
I start by setting up an "envelope" around the entire subject using the LINE tool on the image. The envelope consists of just a few straight lines that enclose the positive shapes, which "flattens" the subject, making it easier to translate the 3D shapes to the 2D surface. I can also begin to record the proportions and placement of some of the elements in the composition.

Switching to the OVERLAY feature, which turns the camera on, I can see my painting surface through live camera while the lines I snapped are still recorded on the screen. Now I can check my initial drawing, make any quick corrections or be happy with any correct result!

I continue to set up more information on the image, still using the LINE tool. I can set up the porportions and the general position of the bottle as it relates to the lavendar sprigs. Changing the color of the line allows me to separate the envelope from the inside shapes.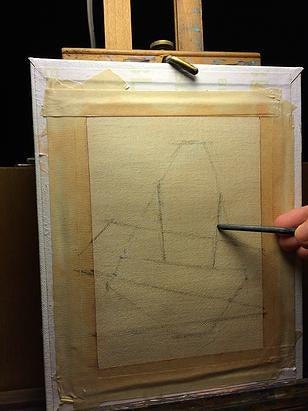
I use soft vine charcoal to draw the lines lightly onto the surface. I'm using a piece of oil primed portrait linen cut from a roll. Soft vine charcoal is very easy to erase or wipe away with a paper towel after the "inking" stage, which comes only when I am confident that I have a good foundational drawing.

Switching back and forth between the captured image and the OVERLAY feature, I can continue to check my work to make sure everything in the foundational drawing is solid. 
I will not rely completely on the accuracy of the camera lens. I have to look at the subject with my own eyes to compare my drawing to the still-life set up. Checking my subject against my drawing eliminates camera distortion, which is likely to show up in my painting if I ignore my subject and rely only on a photo. So there will be a few modifications to the drawing before I commit.
The "ink" is a watery mixture of red oil paint and Gamsol. I've used a lining brush to quickly "ink" over the charcoal drawing. When the "ink" is dry, I can wipe the charcoal away with a paper towel.

I've "inked" the drawing, wiped away the charcoal and I'm ready to begin mixing paint! I only spent a total of 20 minutes setting up the drawing and "inking". The "ink" needs to set for about 30 minutes before wiping away the charcoal.
Thanks for reading this post! I hope this short demonstration of my process was helpful and will encourage you to use Miira for iOS!
~Leslie