
Drawing the Portrait using View Frame
When I studied with Ted Seth Jacobs at his school in Central France, I learned a systematic approach to drawing from direct observation, or rather, drawing from life. He taught me how to begin the drawing by building an "envelope" around a subject, whether a portrait, a figure or a still-life. The envelope encapsulates the entire subject within a simple geometric form made up of 5 - 6 straight, intersecting line segments. After the envelope is in place, the other elements and forms can be added within it's confines. The envelope is conceptual and somewhat difficult to grasp because one has to draw something that is not actually seen. With this blog post, I will describe the systematic process I use to make a portrait and will explain how my invention, The View Frame enables the artist to actually "see" the envelope prior to beginning the drawing. I will also explain how the tool can be used to measure proportions and see the alignment of forms.
My 17 year old son Ben was willing to sit for this portrait over the Thanksgiving break last year. I was very happy with the result because, with View Frame, I was able to capture a likeness very quickly and easily.


I began by setting up the envelope on the View Frame by adjusting the guides to surround Ben's head, before making a mark on the paper.

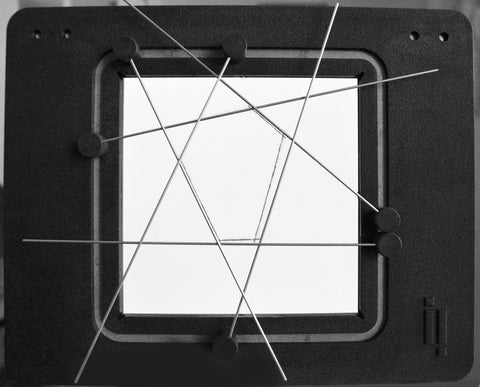
Once the envelope was set up on the View Frame, I looked at my paper through the frame to determine placement and size (View Frame is a wonderful tool for composition). I began to draw each line, comparing them to the guides on the View Frame and making corrections until all the lines coincided with the guides set up on the View Frame.


Next, I began to set up the proportions of the features on the head. I kept much of the envelope intact on the View Frame to serve as an anchor for the new guides that I added to register the placement of the brow-line and the bottom of the nose. When the correct proportions were in place, I began to block-in the features, such as the hair line, the eyes, nose and mouth.


With the features drawn lightly in place, I continued to compare, measure and check alignments. With just one guide on the the View Frame, I checked the accuracy of the placement of Ben's mouth as it related to his eyes. For example, I could see, when looking at Ben through the View Frame, that the right corner of his mouth aligned perfectly on a vertical axis with the tear duct of his right eye. When I determined that truth, I checked my drawing to be certain I had drawn it correctly. I checked the alignments on the left side as well. I also checked to see what feature the bottom of his ear aligned with on a horizontal axis. As it turned out, since his head was tilting down slightly to the left, the ear on the right was a bit higher on than the ear on the left and aligned diagonally with the bottom of his nose.
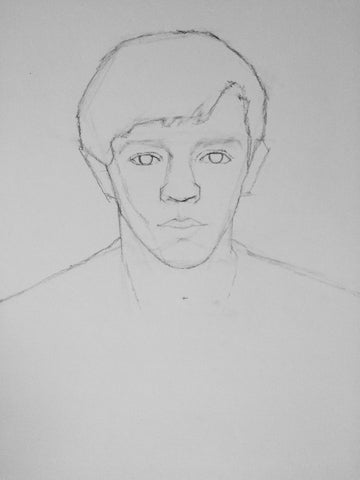


Finally, after feeling confident about the placement of all the features in the block-in, I put the View Frame away and began to develop the contour and mass in the major shadow shapes.
The systematic development of this portrait, from envelope to contour took me approximately 30 minutes when I used the View Frame. Massing and modeling the form, of course, took longer. But the View Frame enabled me to speed up my foundational process dramatically, which got me to the best part, developing form and light and likeness of my model. Even Ben liked the result!

"Portrait of Benjamin", Graphite on Paper, Leslie Lienau ©