
Making a Bouguereau master copy with the Miira App for iOS
Until recently, I didn't have the courage to try making a master copy of a William Adolphe Bouguereau painting. I had passing thoughts, but that's all. It just seemed too difficult. Trying to copy his complex forms and paint beautifully translucent skin seemed, quite frankly, terrifying. Bouguereau was a master draftsman, a master of color and most of all, he was able to brilliantly capture the mood and humanity of the figures he painted.
There are certainly many methods of making a master copy. I could have used a grid system. I could have traced. I didn't want to do either because I'm not crazy about grids and tracing would be too difficult because I'd want to make the painting larger than what my printer could print.
The Miira app for iOS opened up new possibilities for me. At least copying the drawing would be doable since drawing is the foundation and I knew the app could help me do that part. Dealing with painting the copy would come later and would be an entirely separate problem.
In this post, I'll describe what I did to finally accomplish an accurate translation of Bouguereau's "Return From The Market, 1893. The Miira app for iOS made it possible to copy without using a grid and without tracing. I hope this inspires you to have a go at copying your favorite master, no matter how tricky. The app, called "Miira" is just $4.99 and is available on the Apple App Store.
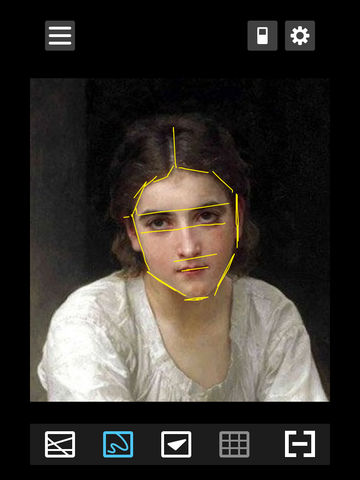
To begin, I downloaded a high resolution image from Wikiart.org, imported it into the Miira app on my iPad and began by using the LINE TOOL to build an *envelope around the entire figure and to divide the major shapes of the head and the position of the figure's folded arms.
I also applied the SHAPE TOOL to understand the overall flattened shape of the entire figure. The envelope SHAPE also served as an anchor for later.


LINE TOOL & SHAPE TOOL: Established the envelope, flattened the entire figure and determined the proportions of key shapes.


OVERLAY FEATURE: This feature behaves like a digital view finder by opening the camera while the shapes and lines remain in place on the screen. By hovering my iPad over the support, I determined the position and the scale of the figure. With vine charcoal (Cretacolor Soft Charcoal Lead), I began to delicately sketch the lines of the envelope and the general proportions of the major shapes. I continued to check their placement against the shapes and lines on the iPad screen. Using vine charcoal allowed me to correct my errors very easily. I used a RayMar 16X20 Claessen's #13 Double Oil Primed Portrait Linen - 1/8" RayMar Panel as my support.


I continued to establish big shapes using the LINE TOOL. I kept the SHAPE in place as an anchor and while in OVERLAY, I drew the lines which established the placement of her arms, shoulders and hairline. Changing the colors of the lines that block-in major shapes helped me to keep them organized.

Here I used the DRAW TOOL to determine the proportions of the features on the girl's face. Once again, I turned on the OVERLAY feature which allowed me to accurately place the brow line, nose and mouth.


I also used the DRAW TOOL which can be used to block-in general shapes or to establish more detail. I used it to block-in.


Once the block-in was complete, I felt I had enough information to begin working on measuring, drawing shapes more definitively and completing a detailed contour of the drawing. Moving into this step was super easy and fast because I had established a solid foundation with the block-in.


After the drawing was complete, I "inked" over the charcoal to set the drawing and get it ready for the first pass of paint. The "ink" is a watery mixture of red oil paint and solvent. I used Rembrandt Cadmium Red Purple and Rublev Spike Oil. I like to use a tiny drawing nib for this stage, although one can use a small lining brush. The nib allows me to make a tiny, controlled line, but I have to work flat for the "ink" to flow properly. After the "ink" was dry, I wiped the charcoal away and had a beautifully transparent line drawing of the Bouguereau copy.
Now the really hard part begins... the painting. I plan to do a full color underpainting and then an opaque second pass. I'll most likely have some adjustments and corrections to make, but I can take my time and enjoy copying this beautiful painting. My goal is to gain, at the very least, a minuscule understanding of Bouguereau's process. I am limited to a printed copy and my computer screen as reference, but I'll do my very best.
We love to learn about your process when you use Miira's tools. Please send us your stories! If you have any questions about this blog post, please don't hesitate to contact me at leslie@miiraartisttools.com.
Happy drawing & painting!
Leslie
For some information about William Adolphe Bouguereau, check out these sites:
http://oilcolorpalettes.blogspot.com/2010/06/william-adolphe-bouguereaus-palette.html
http://www.artrenewal.org/pages/artist.php?artistid=7
If you want to learn more about the "envelope" and the "block-in", check out:
*The Artist's Complete Guide to Figure Drawing: A Contemporary Perspective On the Classical Tradition, by Anthony Ryder. His book is an excellent resource for understanding the "envelope" and "block-in" process:
http://www.amazon.com/Artists-Complete-Guide-Figure-Drawing/dp/0823003035/ref=asap_bc?ie=UTF8